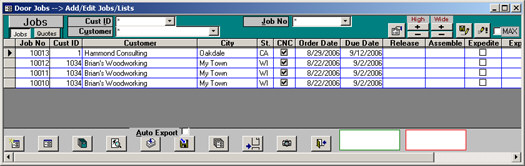
Above is an example of what you will see by selecting Add/Edit Jobs/Lists from the Door Jobs menu. This shows all Jobs, with multiple fields to the right.
· To filter jobs by customer, use the Cust ID or Customer combo boxes at the top.
· To go to a specific Job, entering it in the Job No combo box. You can also hunt jobs by using the Binoculars (Top of Toolbar) paying attention to find what, look-in and Match Criteria. Hint: It often helps speed the hunting to select the field you want to hunt in first.
· The Toolbar A-Z and Z-A buttons can be used to sort any field in the Jobs screen.
· Auto Export: This will automatically run the export parts function every time a job’s cutting list is calculated. If grayed out, this can be enabled in the System > Network Settings.
· Tip: Double Clicking with the mouse over Release Date or Assemble Date will fill in the entry with the current date. You can also then use the + and – keys to go forward or back 1 day at a time.
· The following buttons are all available at the bottom of the Jobs screen. To edit a Job, double click in the Job No field.
|
|
This will create a new Job. |
|
This is used to export parts to other equipment in the shop.
|
|
|
This will edit a selected Job. One can also double-click on the Job No to edit a Job.
|
|
This allows you to edit parts on a selected job. |
|
|
This is where many Door/Drawer related reports are.
|
|
This provides a few kinds of shipping labels. |
|
|
This will show the plant schedule report.
|
|
This is used with the Job Tracking Module. |
|
|
This is used to recalculate parts. If there have been specification changes such as in the door definition, this would recalculate the prices on the selected Job. |
|
This exits the Jobs menu. |