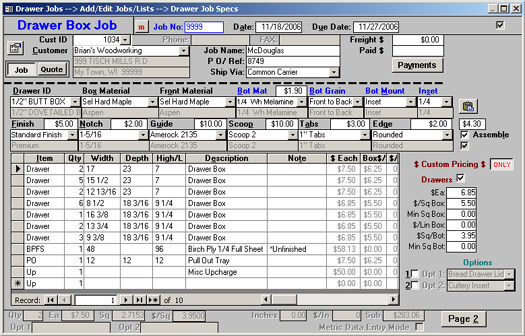
To set up a new job, select the New Job Icon in the Drawer Jobs Form. First select a customer (by ID or Name), then enter Job Name, PO, etc. as desired. This is the header Information for the Job. Once the header Job Information is as desired, you may select the Drawer ID, Materials and Options.
Note: All items below the "Dashed Line" may be changed at any time and will apply to the "Next Drawer Entered".
Note that several options have a price field that automatically changes (based on your settings) when they are picked from the combo boxes (e.g. Bot Material, Finish etc.).
· Drawer ID: Pick the Drawer ID for the particular Drawer Style desired
· Box Material: Select the Box Material desired
· Front Material: Select Front Material if different from Box Material
· Bot Material: Select the Bottom Material desired
· Bot Grain: Choose the direction for the Bottom Material Grain
· Bot Mount: Choose the type of Bottom Mount for your Drawer Job
· Inset: If you picked Inset for the above, then this will allow you to choose the depth of your Inset
· Finish: If there is a finish, then here you would pick the type desired
Also supported are: Notching, Guides, Scoops, Tab, Edges and two additional options (Opt 1 and Opt 2) that can be used as desired. Each of these can be used for all or any part of a job.
After you select your options, simply pick an item (Drawer for example) from the first available Selection. Hitting the Tab key will move you to the next field, were you can enter quantity in. Continue using tab to move you across and eventually to the next item. At any time you can change a Drawer ID, or Material and then enter more drawers with just those specs. After you are done entering in an order, closing the Job will save everything and Drawer Reports will be instantly available.