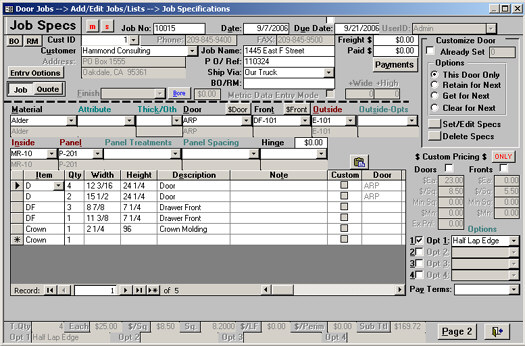
To set up a new job, select the New Job Icon ![]() in the Door Jobs Form. First select a customer (by ID or Name), then enter Job Name, PO, etc. as desired. This is the header Information for the Job. Once the header Job Information is as desired, you may select the Material, Door Style, Profiles and etc.
in the Door Jobs Form. First select a customer (by ID or Name), then enter Job Name, PO, etc. as desired. This is the header Information for the Job. Once the header Job Information is as desired, you may select the Material, Door Style, Profiles and etc.
Note: All items below the "Dashed Line" may be changed at any time and will apply to the "Next Door Entered".
· Material: Select the Material desired.
· Attribute & Thick/Oth: If selected, this can affect the Price Each, Price per Sq/Unit, and a Material % or Line Item % cost.
· Door: Select the Door Style desired.
· Front: These are for traditional slab drawer fronts. 5 piece drawer fronts need to be defined as doors.
· Outside, Inside and Panel: This is where you can select the various Profiles for your items.
· Outside Opts: One of the various extra options that can be used, this allows to add a Price Each, Sq/Unit, Price per Lineal Ft, Line Item %, and/or Price per Perimeter. This may be a good place for things such as applied moldings and etc.
· Panel Treatments/Spacing: For those who do special grooving or treatments on panels, this option can also be selected. It can affect the Price Each, Sq/Unit or Price per Panel.
· Hinge: This can be used with the optional ![]() switch.
switch.
· Opt 1-4: These 4 options are totally customizable and affect all the same pricing as the Outside Opts do.
1) The first thing to do is select a customer. You can use either the Customer ID or Customer Name. If you use the Customer Name and use the pull down, Doorlister® shows you the City and State of the Customer incase you have multiple Customers with same Company Name.
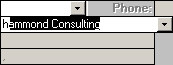
The picture above is the result of just typing the letter "h". Notice that the Job No, Dates and some costs are automatically filled in. If Hammond Consulting was not the company you were looking for, keep typing in the company name. If you had a company called "Hunter Woodworks", typing "hu" may be enough to pull it up. Once you see your desired customer, hit Enter.
2) Next, fill in more information about the job, sort of like a job header. A Job Name, PO or Reference #, and ship via information. You can also put in Freight Costs, Down Payment, and specify if it’s a Job or Quote. 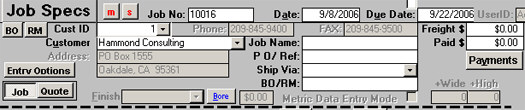
3) Now we can go ahead and select our Material, Door Style and any other options that may be used. 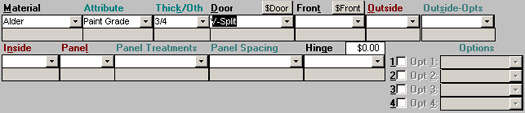
4) After you select your options, simply pick an item (D for example) from the first available Selection. Hitting Tab or enter after pressing D will move to Quantity. Tab or enter again will go into the Width/Height. The arrow keys on the keyboard also work to move around. At any time you can change a Door ID, or Material and then enter more doors with just those specs. After you are done entering in an order, closing the Job will save everything and Door Reports will be instantly available.
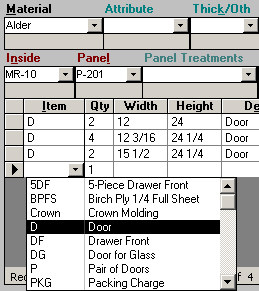
Our example shows D in the Item. The quickest way to enter items is to type it in. In Items, notice that the item "D" is a door. Item "DF" is labeled as a front. You can choose whatever letter you want for entering doors. Older Doorlister® versions used to use "S" for single, which also would work. If you have other things such as the 24in Bread Board, you can set these up in the Items section. You can add as many door/front/profile combinations per job as you want.Note: This second line shows what the currently selected Item is using.
5) ![]()
Near the bottom of the Job Specs screen is this button called Page 2. It has more job related information like sales tax and discounts that may need to be setup before entering Items
6) ![]()
Once finished entering all your items, click the close button. This will bring you back to the Door Job list with the current job selected.
7) ![]()
If your Door Job is finished, the next common step is to go into the Reports menu. This will have many reports to choose from including invoices, wide door assembly lists, and packing sheets to name a few.
· Note: If you move into the Width field for example on the last record (which is a new record) you will get a bark from Doorlister®. This is because there is no Item entered. Hitting escape twice will remedy this and any other accidental entry.
· The second line (under Material, Door etc.) shows the selections for the previously entered item in the list (to activate this line you need to select a row that already has an item entered). The top line (under Material, Door etc.) will be the specifications for the "Next" item entered. When entering a new item in a new row, the second line will be empty.
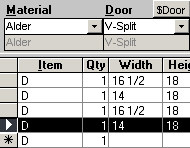
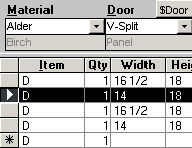
The last 2 doors we entered are Alder. Notice when the last door is selected on the left, the current selection box shows Alder and V-Split. On the right picture, the 2nd door is selected. Notice the current selection window shows Birch, which was the correct material during that door entry.