This feature in Doorlister® that allows for customizing doors/fronts on the fly. You can change virtually any measurement, (stile/rail widths, insets, switches, etc). The customized door is retained only for the current job. Note: Customizing Doors is only for measurements. Changing prices in the Door Definition’s Pricing and Other Considerations tab will not carry over to the job. Use Custom Pricing previously discussed to customize the price before customizing door.
Note: You must enter the door before customizing the door. If you are also doing custom pricing, this must be done before the door is entered. To do both: First, enter the Custom Pricing, then create the door, then select the door and hit Set/Edit Specs.
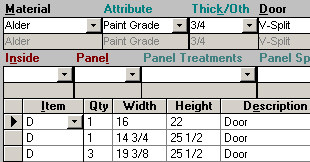
1) First thing we need to do is select the door we want to customize. On the picture to the bottom, the black triangle is pointing to the 16x22 door. Our customer wants to have 3" top/bottom rails rather than the default 2.25". Especially with odd-ball orders, you may not want to make permanent doors for every little custom thing (especially if it’s a rare situation).
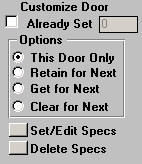
2) Before we press Set/Edit Specs let’s take a look at the Options.
· This Door Only: This will only customize the current door selected. The next door that is entered will not have any custom parts.
· Retain for Next: If you customize a door, you can have that custom definition retained for every next door you enter. This is useful if you have a group of doors with the same custom part (i.e. 3" stiles). When you are finished with these custom doors, select the Clear for Next to stop the customizing.
· Get for Next: If you select an already customized door and select Get for Next, this will store the definition for the next door entry. By default Get for Next will turn into Retain for Next after the first door is entered.
· Clear for Next: This will stop the customized definition from applying to the next door.
3) For this example, we will only be modifying this Door only. With that (This Door Only) button checked, let’s select the Set/Edit Specs button. After a brief message, we will see a screen that looks like below:
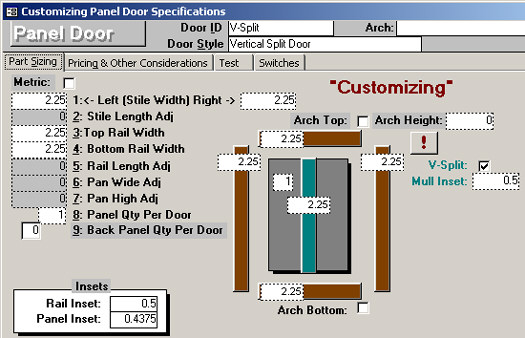
4) Let’s change our 2.25" Top/Bottom Rails to 3". The only tabs that are changeable are Part Sizing and Switches. After you change the stiles, click on the Test button and try it out. When you’re happy with your customizing, close the window (X at top right).

5) Once you close the customized definition, we will see our 16x22 door with a ü in the Custom Button. This indicates that our door is customized. If you click set/edit specs on the door you will see the 3" top/bottom rails. Note: It is also common to put a note on the Item Note as shown in the picture with custom door specs.
6) If you recall, we had picked This Door Only for the 16x22 door. The other doors are still stock definitions. If a custom definition is accidentally applied to doors that should not have it, simply hit Delete Specs. Here at the bottom we can see an example of a Wide Door Assembly List:
