Let’s say we forgot to check Retain for Next and our other doors should also have 3" Top/Bottom Rails. Since our 16x22 door already has the 3" Rails, we don’t need to retype the doors. Instead look below:
1) With the 16x22 selected, Click the Get for Next button.
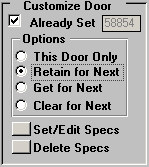
When this happens, the Retain for Next option becomes checked and a number appears in the Already Set.
2) As shown below, let’s click on our 14 3/4 by 25 1/2 Door in the Item Field. If you delete and retype D, as soon as you click on a different item (such as our last item below) you will see the Custom Box check. 
If the D is highlighted as above, you can simply just retype D. If you click your mouse after hitting D on a different Item, this checks the Custom Box. If you decided to hit enter, you will move across to Qty, to Width, and to Height. When you hit enter after the Height, this will check the Custom Box. While hitting enter, you could change the qty/width/height and after hitting enter it would customize it.
3) Delete Specs: Clicking this button while a customized door is selected will remove the customized definition and revert it back to the stock definition.