
Before you get into the program too far, there are a few conventions that should be explained. Doorlister® uses several different Windows methods to help you navigate and operate throughout the program and forms.
Throughout Doorlister®, you can make selections with the enter key when an item is selected (like Door Jobs), or you may use the left mouse button to make a selection. Also, whenever a letter is underlined on the screen, (such as the C in Customers), you may activate that choice by holding the Alt key and hitting the underlined letter or number (i.e. Alt-C for Customers).
Many of the forms in Doorlister® utilize buttons with Icons (little pictures) on them. To get more information about what one of these buttons do, hover the mouse pointer over the button for a few seconds and a Tool-Tip will pop up giving more details and the Hot (Alt-Underlined) character to activate the Button. Just like the command buttons with words, you may select the Icon command buttons using the mouse, or the Alt-Character key from the Tool - Tip.
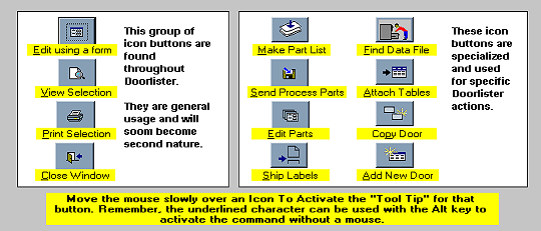
Like the selections on the Main Menu, most of the Menu’s throughout Doorlister® use Command buttons with words. Simply select the button of your choice using the mouse, arrow keys, tab keys or the Alt Key combined with the underlined character of the button to activate the button.
![]()
Check boxes indicate a Yes/No or On/Off condition. A ü in the check box indicates Yes or On. Most check boxes will also have Status bar text to help explain what they do if it’s not clear from the title.
![]()
The status bar is a small row at the bottom left of the screen. In many places within Doorlister®, when the cursor is on a particular field or selection, status bar text will appear to give more details. Many people miss the status bar text which can often answer questions that would otherwise arise.
![]()
Option groups give a convenient way to select from a small group of choices. These are a "Which choice" (which one of the group) type of selection. Select the option of your choice using the mouse pointer or by using the spacebar on the keyboard when the option is selected.
Doorlister® uses combo boxes extensively… they provide several advantages: Combo boxes can contain all the possible choices for a selection and can thus perform quality control (to make sure it was spelled like it was last time), provide convenient lookups and speed data entry. (Sometimes they fill in the value automatically based on the character typed in from the keyboard. To activate a combo box and see its contents before (or during typing) you may click on the down arrow button on the right side of the combo box or hit the F-4 Function key. Some combo boxes allow you to add new items to the list as you go, others do not depending on the functions being performed.

NOTE: You do not have to activate (pull down a combo box to enter something into it. If you know what you want (such as a customer ID), you may simply type it in.
Many forms in Doorlister® provide a toolbar (with Tool-Tips) at or near the top of the screen when the form is opened. These toolbars can actually be moved around the screen if desired but are designed to work well when anchored near the top left corner of the screen.

Note: To find out what a tool-bar icon does, like the Icon command buttons, the toolbars provide Tool-Tips (more detail). To see a Tool-Tip, simply hover your mouse pointer over the tool for a few seconds. (Don’t click unless you want to activate the tool . Many of the editing forms, especially the ones in the System Settings section, rely on the toolbar close button to close the form.
Top Line menus have become a Windows convention and are used extensively in many windows programs. Doorlister® provides top line menus also, but there is very little need to use them as Doorlister® is a database application and is Menu and Toolbar driven. However if you prefer using top line menus because of your other windows experience, you may perform many functions within Doorlister® using top line menus.
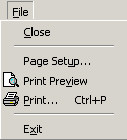
If you need to change printer drivers for a particular report, you may View the report in Pre-View mode and select Page Setup… from the File top line menu and make changes as desired. Note: Don’t choose Exit from the top line "File" menu unless you want to exit the program completely. To simply Close the window and return to the previous form chose "Close" not "Exit".
Throughout Doorlister®, lists are used for different purposes. On a day to day basis, new jobs are entered and then later these jobs may need to be changed (items added, payments made, orders changed etc.) Job lists are presented sorted with the newest jobs showing at the top of the list. When you want to edit a job, make an assembly list, produce cut list or whatever, Doorlister® takes the Current Selection to apply actions you select.
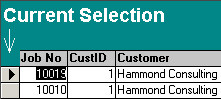
The Current Selection can be identified by the small right pointing arrow in the left hand column of these types of lists. You may change the Current Selection by scrolling the list with the scroll bar on the right of the screen and then selecting a column on the desired selection with a mouse. In many cases (on many screen lists) there are combo box selectors near the top of the screen if you need to "Lookup" a specific selection or group of selections (i.e. all jobs for a particular customer).